日本語版はこちらのリンクでです。
NEW LEVEL STUDIO POWER
Expensive-sounding discrete mic preamps and vintage gear emulation
The Antelope Audio Discrete 4 console-grade discrete microphone preamp interface comes with four 6-transistor discrete preamps, 121dB dynamic range conversion, and rock-solid clocking. Discrete 4 also features the Antelope Audio premier real time FPGA FX modeling of iconic studio gear from BAE, Lang, Gyraf Audio, FET, and many more.
System Requirements
Computer:
- USB 2.0 equipped Mac or PC
- Thunderbolt™ 2 equipped Mac or PC
- Core 2 Duo minimum, Core i3/i5/i7/Xeon recommended
- 4 GB RAM minimum, 8 GB RAM recommended
Operating system:
- OS X 10.11 (El Capitan) and greater
- Windows 10
1. Safety Notes
To reduce the risk of electrical shocks, fire, and related hazards:
- Do not remove screws, cover, or cabinet. There are no user serviceable parts inside. Refer servicing to qualified service personnel.
- Do not expose the device to rain, moisture or spillover of liquid of any kind. Should any form of liquid or a foreign object enter the device, do not use it. Switch off the device and unplug it from the power source.
- Do not use the device until the foreign object is removed or the liquid has completely dried and its residues fully cleaned up. If in doubt, please consult with the manufacturer.
- Do not handle the power cables with wet hands! Make sure the device is switched off when plugging and unplugging it from the power source.
- Avoid placing any objects on the cabinet or using the device in a narrow and poorly ventilated place. Doing so could affect its operation or the operation of other closely located components. If anything goes wrong, turn off the device first and unplug the power.
- Do not attempt to repair the device yourself: consult authorized service personnel or your dealer.
- Do not install the unit near any heat sources such as radiators, stoves, or other apparatus (including amplifiers) that produce heat.
- Do not use harsh chemicals to clean your Unit. Clean only with specialized cleaners for electronics equipment. Connect all your devices before powering your Unit. This unit is connected via its power cord to the mains safety earth. Never operate the unit without this earth connection.
- Power supply cable should be routed so that it is not likely to be walked on or squeezed by items placed upon or against it.
- To completely turn off the device, unplug the power cable first from the outlet and then from the rear panel of the unit.
- Both, occasional and continued exposure to high sound pressure levels can cause permanent ear damage via headphones and monitors.
The device is designed to operate in a temperate environment, with a correct Operating Temperature of: 0-50 °C, 32- 122 °F
2. Introduction
Thank you for purchasing Discrete 4 from Antelope Audio.
Discrete 4 was developed after an extensive research of legendary microphone preamp circuitry. While they sound great on their own, the Antelope Audio FPGA engine is able to transform them into several classic units. It all happens in real time and with as authentic responsiveness as possible!
Discrete 4 includes Accusonic 3D microphone and preamp models, guitar amp sims, transformer & tube FX, and a huge selection of classic vintage gear — now accessible in any DAW, thanks to the freshly introduced Antelope AFX2DAW Plugin.
Although Discrete 4 was designed to work with any microphone, it really shines with the Antelope Audio Edge and Verge modeling mics. They are designed to exclusively match the discrete preamp architecture of the interface, though they perform very well with other products.
Furthermore, the Antelope Audio real time FPGA platform is now extended to a complete professional studio experience, boasting a selection of classic Microphones, Preamps, Conversion, Compressors, EQs, Guitar Amps & Cabinets, and our AuraVerb reverb. Use them within the Discrete 4 Control Panel, or in your favorite DAW with the new AFX2DAW Plug-in. Perform and record in real time with the FX, or apply them during production.
Like most Antelope products, Discrete 4 is a rock-solid clocking solution itself. It borrows our 4th Generation 64-bit Acoustically Focused Clocking (AFC) technology you may know from Antelope classics like the Trinity & OCX HD master clocks, or the Pure2 mastering converter. With two Word Clock outputs, the Discrete 4 is an exemplary master clock in itself, letting you distribute its clock signal across your studio.
The Monitoring features in Discrete 4 are very flexible and a breeze to set up. Create up to 4 individual monitoring mixes and send them to Headphones or Monitor Outputs, with or without FPGA FX. Our Vintage EQ, Compression, and authentic Guitar Amp emulations let recording artists experience fully convincing sound that comes as close to the real thing as possible.
With Discrete 4, users can save and load AFX presets and exchange settings with all Antelope Audio FPGA-equipped interfaces. Sharing your own FX settings with other devices and users is quick and easy.
What’s more, the free-to-download Discrete 4 Remote App (Android & iOS) lets you adjust all microphone input levels and grants full control over Monitoring, and Headphone volumes. For the first time, musicians can control their own headphone volumes through their smartphones, too.
We hope you enjoy working with the Discrete 4 and take full advantage of all the possibilities it has to offer!
For the latest information and updates visit: http://www.antelopeaudio.com/
Enjoy working with Discrete 4!
All the best,
The Antelope Team
3. Features
⦁ Real time 3D mic modeling via FPGA engine
⦁ 50+ Premier real time FX, also accessible in DAW
⦁ 4 console-grade Class A mic pres with discrete transistor design
⦁ Precise and recallable stepped gain control
⦁ 4th Generation 64-bit Acoustically Focused Clocking
⦁ FPGA FX models of BAE, Grove Hill and Gyraf Audio classics
⦁ NEW AFX2DAW Plugin for accessing the FPGA FX in your DAW (Coming soon)
⦁ 4 Analog inputs on combo XLR connectors (2 Mic / Line; 2 Hi-Z / Mic / Line)
⦁ 4 Analog Line outs on TRS connectors
⦁ Thunderbolt™ 2 & USB connectivity (TB for Windows coming soon)
⦁ A pair of Monitor outs on TRS connectors
⦁ 4 Stereo Headphone outputs
⦁ 2 Word Clock outputs
⦁ Additional digital connectivity via S/PDIF and 2x ADAT
⦁ Up to 3 individual monitoring mixes with FPGA FX
⦁ Create & share custom presets
⦁ Intuitive EasyPanel software control
⦁ Remote iOS and Android compatible app
⦁ Basic FX pack – use 2 channel strips with 2 instances of all FPGA FX
⦁ Premium FX pack – use 4 channel strips with 4 instances of all FPGA FX
4. Quick Start
Connect the DC power source on the rear panel.
Once the DC power source is plugged in, connect Discrete to your computer via USB 2.0 or Thunderbolt™ (MAC) and follow the steps below:
- Navigate to antelopeaudio.com.
- Click on LOG IN and create your Antelope Audio account. If you have one please log in using your credentials.
- Go to Discrete 4 download page to download and install the Antelope Audio driver and launcher. If you have ordered Discrete 4 or 8 with Premium Upgrade Pack, you must receive a code for Premium Upgrade Pack from your dealer & activate it from your account from CLAIM FEATURES.
- When the installation is complete, start the Antelope Audio launcher and launch the control panel.
You’re good to go! Need more help? Contact our tech support crew.
5. Panels explained
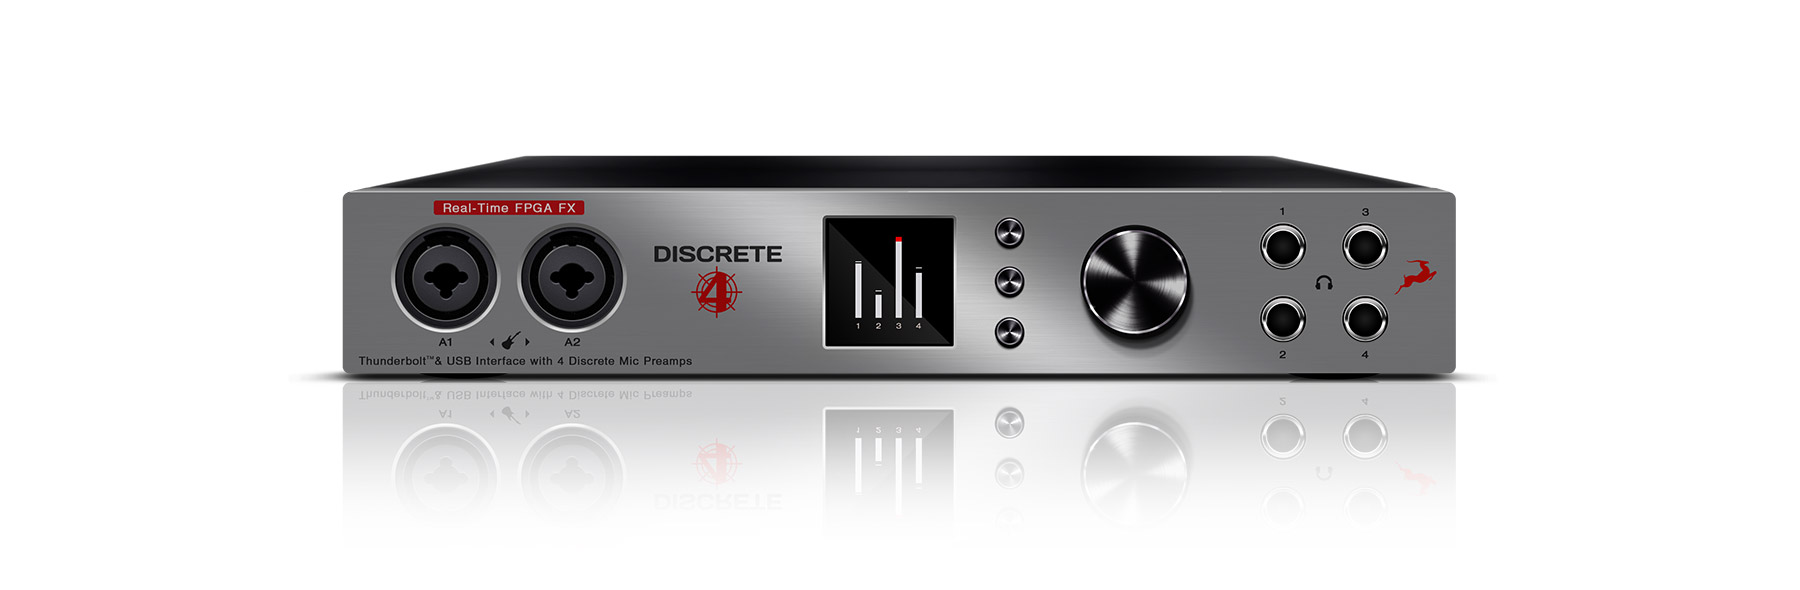
5.1. Front Panel
 1
1
1. Two Instrument / Mic Preamp / Line inputs
Two console-grade Class A mic pres with discrete transistor design and individual phantom power. Mic input on XLR connector with switchable Line/Hi-Z input over TRS.
2
2. Display
Multi-function display that shows various information. Use the three function buttons to navigate menus.
3
3. Functional Buttons
By pressing the Function buttons, you can cycle through the menus and view various information.
4
4. Rotary control
Large stepped attenuator for Monitor, Headphone and Line output volume. Pushing-in lets you scroll between menu entries and make adjustments.
5
5. Headphone outputs
Four independently assignable headphone outputs, selectable and controllable via the main rotary control or the Control Panel.
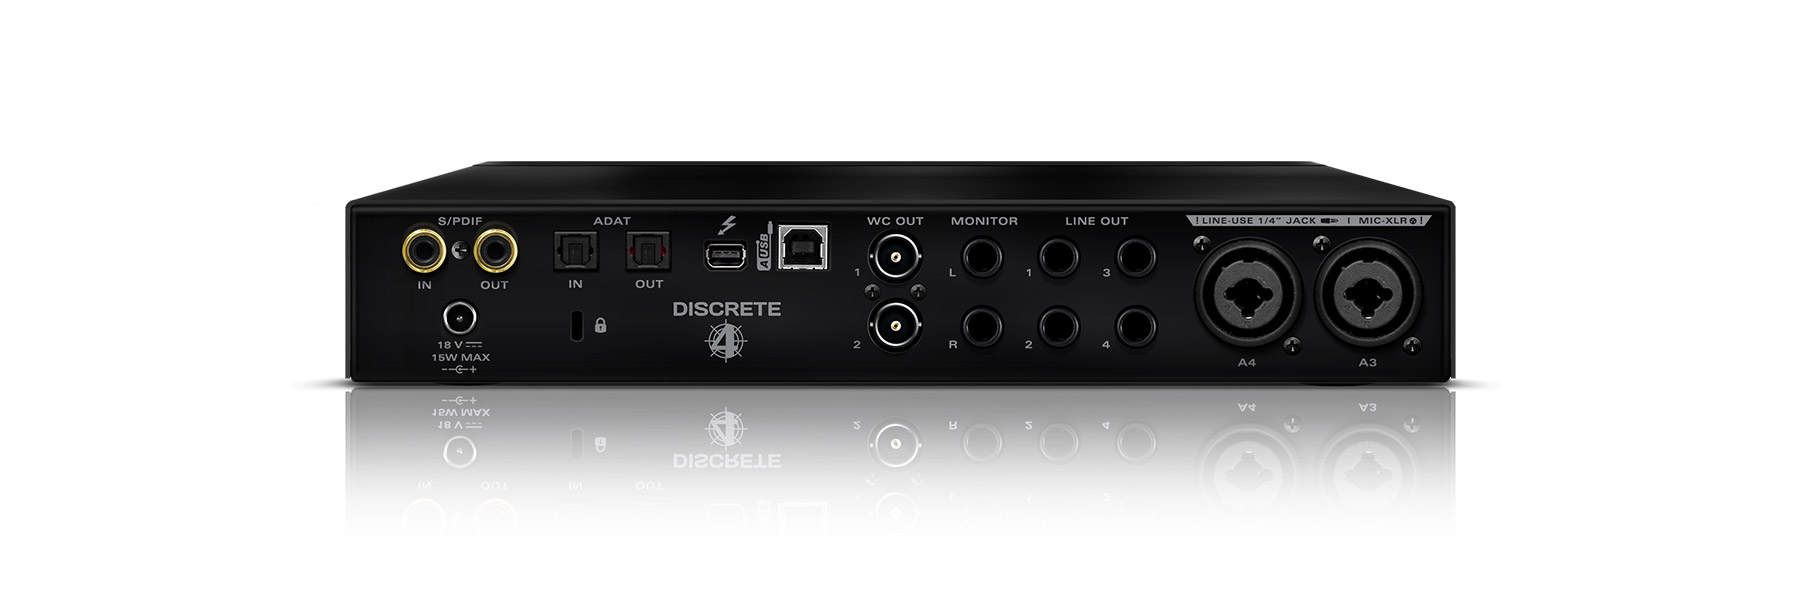
5.2 Rear Panel
 1
1
S/PDIF Input/Output
75 Ω S/PDIF inputs for use with compatible equipment.
2
ADAT Connectors
One input & one output with up to 8 channels per line.
3
Thunderbolt™ port
Connect your Discrete 4 to a Thunderbolt™ port on a Mac computer using a Thunderbolt™ cable (not included).
4
USB High-Speed
Connect your Discrete 4 to a USB port on a Windows or Mac computer with the bundled USB cable.
5
Word Clock Outputs
Two Word Clock outputs on BNC connectors for syncing external gear.
6
Stereo Monitor Output
Assignable balanced stereo output (left channel at the top and right channel below).
7
Line Outputs
Four assignable Line outputs on TRS connectors.
8
Mic/Line Inputs
Two console-grade Class A mic pres with discrete transistor design and individual phantom power. Mic input on XLR connector, Line input on TRS connector.
9
DC Power Connection
Only for use with the Antelope Audio DC power supply!
10
Kensington Lock
Used to lock down the device in demonstration rooms.
11
5.3 Hardware controls
Let’s have a deeper look at the Discrete 4 front panel and see what you are able to accomplish with its three function buttons, rotary control, and LCD display!
Function Button 1 (top-most)
- Pressing Function Button 1 cycles through Monitor Volume, Line Out Volume, and Headphone Output (HP) 1 – 4 Volume. Use the rotary control to adjust volume.
- Press and hold Function Button 1 to access the Discrete 4 System Menu (explained below). Use the rotary control to select an entry in the menu. Press the rotary control to enter the selected sub-menu. Turn the rotary control left or right to adjust the setting.
- Press the rotary control to toggle Monitor Volume Mute On/Off.
- Press any of the function buttons to exit.
Discrete 4 System Menu
1. Comm. Interface: Switch between USB and Thunderbolt™ mode. Use the appropriate setting for your connection.
2. Device Info: Shows the following information: Serial Number, Hardware Revision, Firmware Version.
3. Scr Save Time: Adjusts the length of time before the screensaver turns on. The following options are available: Off, 2 min, 5 min, 15 min, 30 min, 60 min, 120 min.
4. Scr Save Style: Lets you choose the screensaver style. The following choices are available: Star & Black. Press the rotary control in to confirm.
5. Factory Reset: Lets you restore factory presets. Useful for troubleshooting the Discrete 4. Be careful, pressing the rotary control activates the function instantly, without asking for confirmation.
Function Button 2 (middle)
Function Button 3 (bottom-most)
6. Software
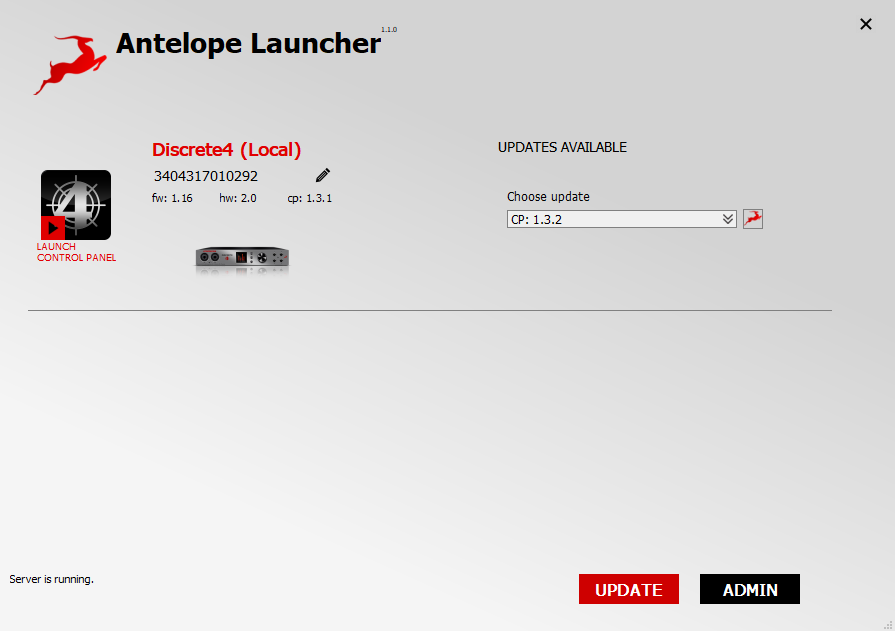
6.1 Antelope Audio Launcher
The Antelope Audio Launcher is a one-stop shop where you get to keep the Discrete 4 up-to-date, access the Control Panel, and create remote connections.
Upon startup, the Antelope Audio Launcher connects to the Internet to check for available updates.
 1
1
1. Information Panel
Shows the following information about your connected Antelope Audio devices:
- Device name
- Serial number
- Firmware version
- Hardware revision
- Control Panel version
2
2. Launch Button
Launches the Discrete 4 Control Panel.
3
3. UPDATE Button
Antelope Launcher will notify you for available updates. When updates are available, press the UPDATE button and follow the on-screen instructions to proceed.
4
4. ADMIN Button
Opens the Server Administration menu
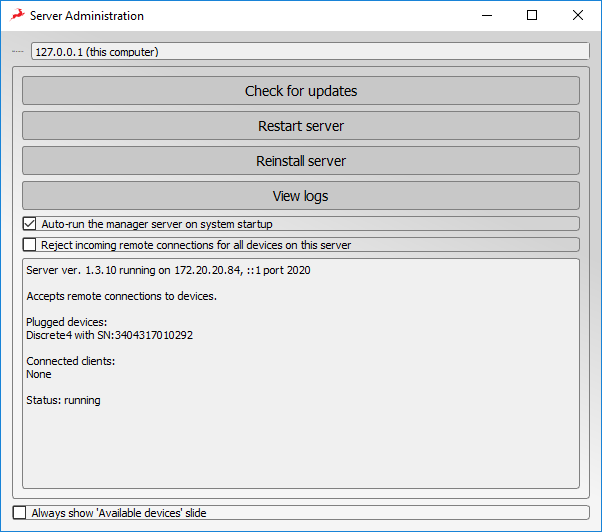
Server Administration Menu
 1
1
1. Server list
Choose which computer to connect to over the audio network. The available computers list is available as a drop-down menu.
2
2. Check for updates Button
Check for updates to your Discrete 4 firmware and Control Panel software.
3
3. Restart server Button
Restarts your connection and the Discrete 4 Control Panel.
4
4. Reinstall server Button
Press this button to perform a re-install.
5
5. View logs Button
Access logs from your network sessions.
6
6. Toggles whether the manager server will launch with system startup.
7
7. When this toggle is enabled, all incoming remote connections for all devices on the current server will be automatically rejected.
8
8. Shows the following information:
- Server version and port number
- Connection Status – accept or reject remote connections to devices
- Plugged devices and their serial numbers
- Connected clients and their IP address
- Server Status
9
9. Toggles the Available Devices slide On or Off
6.2 Control Panel
Designed for maximum ease of use, the Discrete 4 EasyPanel Control Panel lets you control every aspect of the Discrete 4, including routing, mixing, AFX and Microphone Emulations. Following is an explanation of the software. We provide illustrations and workflow examples to, hopefully, help you master the Discrete 4 and its Control Panel in no time!
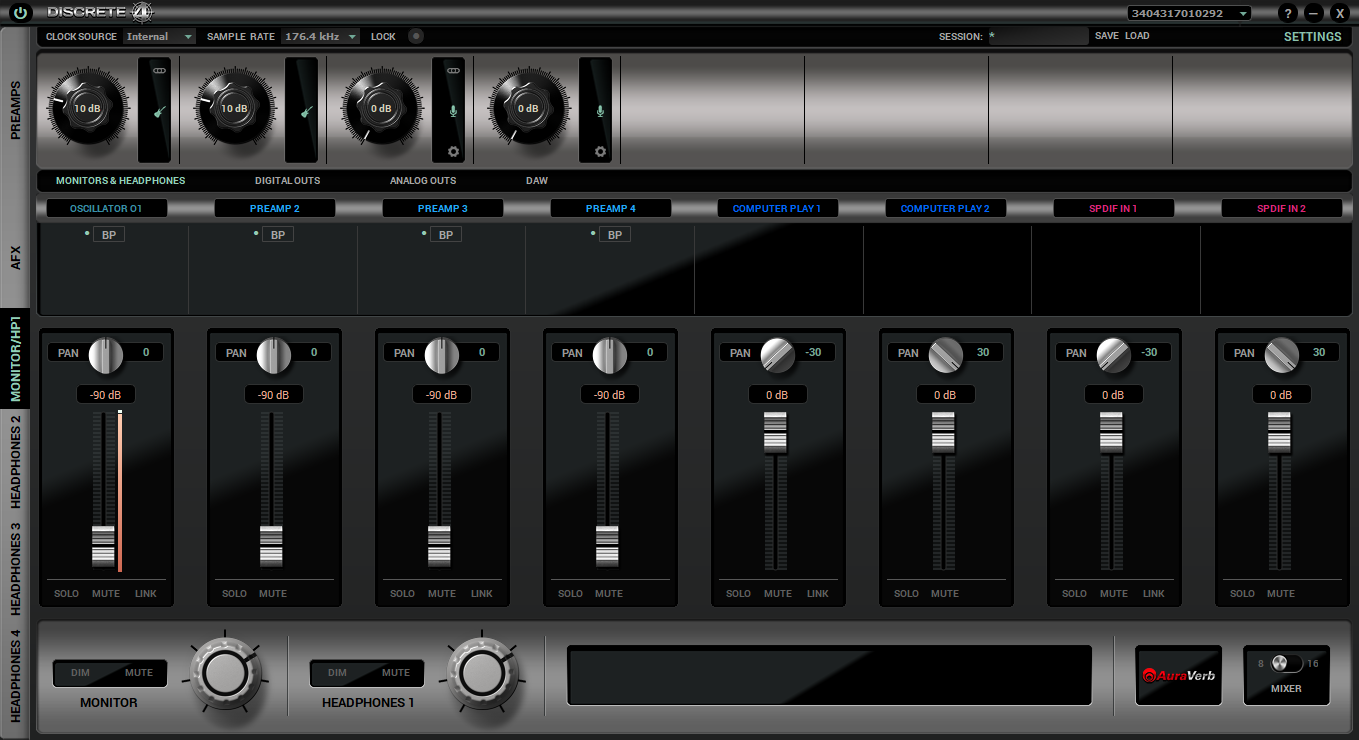
6.2.1 The Function Strip

The Function Strip has the following buttons and features:

1. Power Button
Toggles the Discrete 4 hardware unit between Standby mode and Power On mode. Note that Discrete 4 remains in Power On mode by default, regardless of whether it’s connected to a computer that’s switched on or not. There are no Power or Standby buttons present on the unit itself, though you can put it in Standby mode from the Control Menu. To turn it off, you must cut the power from the power strip or disconnect the adapter from the grid.

2. Device Selector Menu
Select your device by its serial number from the drop-down menu.

3. Tech Support Button
Opens a window with the following information:
• Control Panel Version
• Hardware Version
• Serial Number
• Firmware Version
Additionally, there’s the Administration Button. It launches the Antelope Herd Wizard, which has the following options:
• Register device or assign features
• Unregister device or assign features
• Logout
Pressing the Help Button offers the following shortcuts:
• Watch online video tutorial
• Chat with technical support
• Search for solution at support page
• Contact support team over the phone

4. Minimize Button
Minimizes the Control Panel to your Taskbar (Windows) or Dock (Mac).

5. Close Button
Quits the Control Panel.

6. Clock Source Selector Menu
Lets you choose the Clock Source — Internal, ADAT, ADAT 2x, ADAT 4x, S/PDIF, USB

7. Sample Rate Selector Menu
Lets you choose the device sample rate. Discrete 4 supports the following sample rates: 44.1 kHz, 48.0 kHz, 88.2 kHz, 96.0 kHz, 176.4 kHz, 192 kHz

8. Lock Toggle
Locks the Discrete 4 sample rate so it doesn’t get changed by your DAW, operating system, or another influence.

9. Session Recall
Lets you immediately recall a previously saved session. The Discrete 4 Control Panel lets you save and export Sessions – pre-defined configurations of inputs, outputs, levels, mixes, effects, and anything else relevant to your project. These sessions can be shared between Discrete 4 users and stored for backup purposes.

10. SAVE Button
Opens the Save Session window where you can specify precisely which components of your project you want to include. The Save button saves the current session. The Save As button lets you export the current session to a file for backup & sharing.

11. LOAD Button
Opens the Load Session window where you can:
• Load a Session file by clicking Browse and navigating to its location on your computer.
• Use the Load Last Session button to quickly recall your most recent work.
• Set Defaults

12. SETTINGS Button
Opens the Discrete 4 Control Panel Settings window.
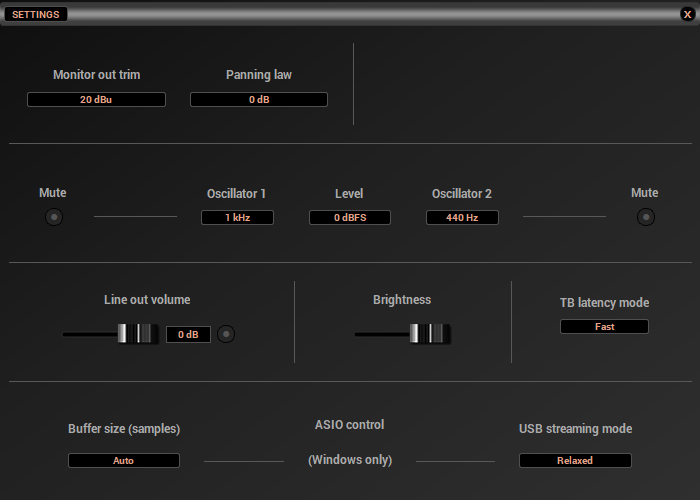
The Settings Panel
Opens the Discrete 4 Control Panel Settings window where the following options are present:
 1
1
1. Monitor Out Trim
Lets you attenuate the Discrete 4’s monitor output signal level by 14 to 20dBu.
2
2. Panning Law *
Lets you specify the Panning Law between 0dB to -4.5dB. * As the mono signal is panned from center to hard left or right, it will increase in loudness up to 6.02 dBSPL. To ensure perceived loudness stays the same, this has to be compensated for. The Panning Law setting lets you specify the compensation amount in dB.
3
3. Mute Toggles
Used for muting Oscillators 1 & 2. The Discrete 4 has built-in oscillators that generate 440Hz or 1kHz signals (sine waves) for testing the interface outputs during troubleshooting.
4
4. Oscillator 1
Adjust the Oscillator 1 frequency.
5
5. Level
Choose between 0 to -18dBFS amplitude for Oscillator 1 & 2 output signal.
6
6. Oscillator 2
Adjust the Oscillator 2 frequency.
7
7. Line Out Volume
Set the Line Out volume in dB.
8
8. Brightness Slider
Set the Discrete 4 screen brightness.
9
9. TB Latency Mode (Mac Only)
Lets you set the Thunderbolt™ Latency Mode to Fast, Medium, or Slow.
10
10. ASIO Control (Windows-only)
This is where you adjust the Discrete 4 ASIO driver for best performance on Windows computers.
11
11. Buffer Size (Samples)
Lets you set the ASIO driver buffer size. Short buffer sizes minimize latency but take more CPU power. Bigger buffer sizes result in lighter CPU load, but generate more latency. We recommend low buffer sizes for live recording & monitoring, and higher buffer sizes during mixdown.
12
12. USB Streaming Mode
Lets you switch between several latency settings for USB streaming.
6.2.2 PREAMPS
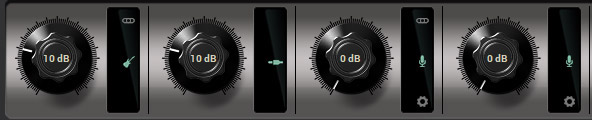
Always visible in the Control Panel, the Preamps section lets you control the Discrete 4 Mic Preamps. The following options are available:
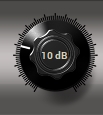 1. Gain Knobs
Turn the knobs right to increase gain, or left to attenuate.
 2. Link Button
Link Preamps 1 & 2, or Preamps 3 & 4 in pairs. When switched on, adjusting the Preamp 1 gain will also change the Preamp 2 gain, and vice versa. The same goes for Preamps 3 & 4.
3. Mic/Line/Hi-Z Selector Button
Switch between three different modes for each preamp. Which mode to use depends on the instrument that you are recording.
 Mic mode is for recording microphones. This mode offers up to 65dB of gain. Additionally, clicking the cog wheel icon launches the Mic Emulations window.
 Line mode is for recording line-level sources like synthesizers, keyboards, samplers, effects units, players etc. Up to 20dB of gain are available in this mode.
 Hi-Z mode is for recording high-impedance instruments like the electric guitar. It has up to 39dB of gain. Hi-Z mode is only available on Preamps 1 & 2, located on the front panel.
6.2.3 AFX
Stack and bypass software effects. The Antelope Audio AFX Rack is explored in detail later in this manual.

6.2.4 MONITOR/HP1
Contains controls for the Discrete 4 monitor outputs and Headphone Output 1.
6.2.5 HEADPHONES 2 - 4
Contain controls for the Discrete 4 Headphone Outputs 2-4.
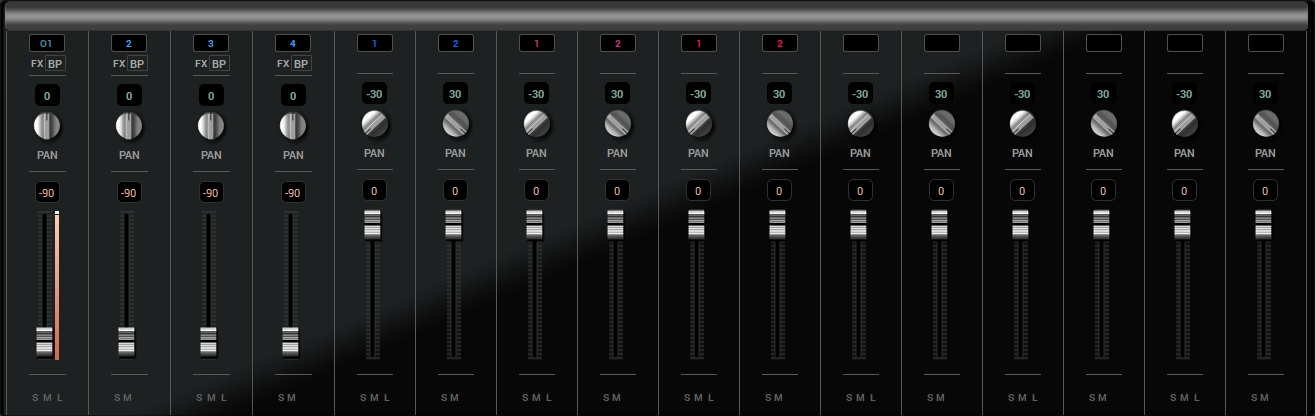
6.2.6 MONITORS & HEADPHONES
This is where you route the Discrete 4 analog & digital inputs to the 2 monitor or 4 headphone outputs. In this mode, the following mode-specific controls are provided:
 1
1
1. FX Button (in 16-channel view)
Opens the AFX Rack where you stack and manipulate different effects to form a Channel Strip.
2
2. BP Button
Used to bypass the AFX you stacked onto each of the mixer’s 16-channels. Useful for A/B-ing between “dry” and processed audio, noting the changes that occur with the application of different effects.
3
3. Pan Knob
Used for panning the signal to the left or right in the Stereo field.
4
4. Gain Fader
Lets you adjust the volume level of each channel in dB. Gain meters are provided for monitoring volume level. Ideally, none of the meters should be in the Red. This means the signal is too hot and digital clipping occurs, destroying the audio.
5
5. DIM Button
Automatically attenuates the output when so everyone can hear your voice over the mix.
6
6. MUTE Button
Completely mutes headphone output.
7
7. AuraVerb
Engages the AuraVerb reverb. The effect is covered in detail in the AFX & Mic Emulations manual.
8
8. MIXER Switch
Switches between 8- and 16-channel mixer views.
 1
1
1. Monitor Gain Knob
Used for adjusting the monitor outputs volume.
2
2. DIM Button
Automatically attenuates the main output so everyone can hear your voice over the mix.
3
3. MUTE Button
Completely mutes the monitor output.
4
4. Headphones Gain Knob
Used for adjusting the Headphone 1 output volume.
5
5. DIM Button
Automatically attenuates the output when so everyone can hear your voice over the mix.
6
6. MUTE Button
Completely mutes headphone output.
7
7. AuraVerb
Engages the AuraVerb reverb. The effect is covered in detail in the AFX & Mic Emulations manual.
8
8. MIXER Switch
Switches between 8- and 16-channel mixer views.
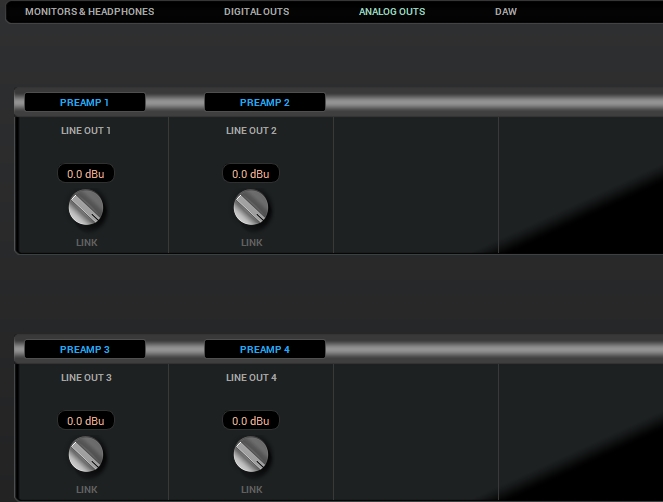
6.2.7 ANALOG OUTS
This section is dedicated to the Discrete 4 analog outputs – Line Out 1 & 2 and ReAmp (Line Out 3 & 4). Simply use the drop-down menu to choose which channel you want routed to which output. Use the Gain knobs to adjust output volume. Feel free to link the Line Outs for convenience.
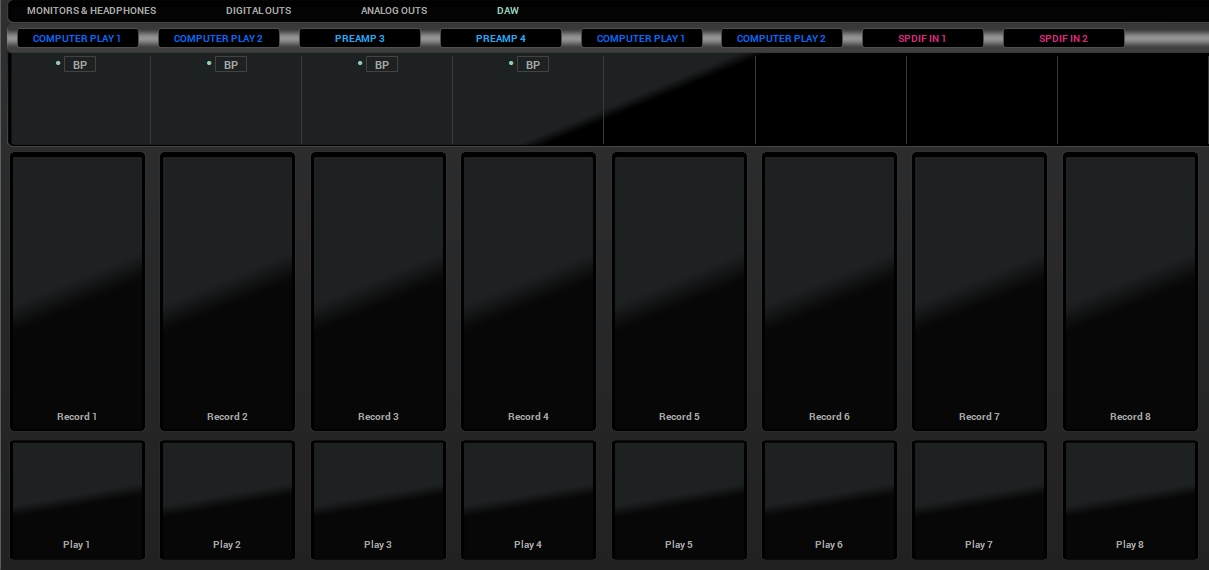
6.2.8 DAW
This section is dedicated to the inputs and outputs of your DAW. Inputs Record 1 to 8 go to your DAW. Outputs Play 1 to 8 are routed from the DAW.
6.3 AFX Rack
The AFX Rack is where you insert effects into a mixer channel, forming a Channel Strip to process audio with. It's accessible by clicking inside the empty fields below the mixer's BP buttons (in 8-channel view) or clicking the FX button (in 16-channel view).
The Antelope Audio AFX collection is vast, comprising an Equalizer, Compressor, the PowerGate noise gate, the AuraVerb reverb, 21 Vintage EQs, 13 Vintage Compressors, 10 Guitar Amps and 10 Guitar Cabinets. Additionally, our Mic Emulations currently number 11 models for the Edge large-diaphragm modeling mic, and 5 models for the Verge small-diaphragm modeling mic. We aren't stopping here, our team is working hard to expand the AFX and Mic Emulations suites with more models of coveted studio gear!
We are confident you will find our emulations sound and behave incredibly lifelike. That's because they are all happening in real time on the Discrete 4's FPGA (field-programmable gate array) chip. FPGA technology lets us provide authentic, circuit-level emulations of classic studio hardware. Rather than "describe" circuitry in abstract DSP code, we dynamically re-configure the chip to behave exactly like it.
That's right – we recreate all this rare vintage equipment on an actual hardware circuit, piece by piece. This way, the FPGA literally takes on the personality of the same circuitry and components that forged the sounds of countless classic records. It's a bit of a marvel, really!
There are some limitations in place, however. The number of effects you can apply simultaneously depends on which Discrete 4 bundle you purchased. Here's the breakdown:
⦁ Discrete 4 Basic – 2 channel strips with 2 FX instances each & all 50+ Antelope Audio real time FPGA FX emulations + Mic Emulations.
⦁ Discrete 4 Premium – 4 channel strips with 4 FX instances each & up to 16 channel strips using the upcoming AFX2DAW plug-in and all 50+ Antelope Audio real time FPGA FX emulations + Mic Emulations.
With this out of the way, let's jump into the AFX Rack!
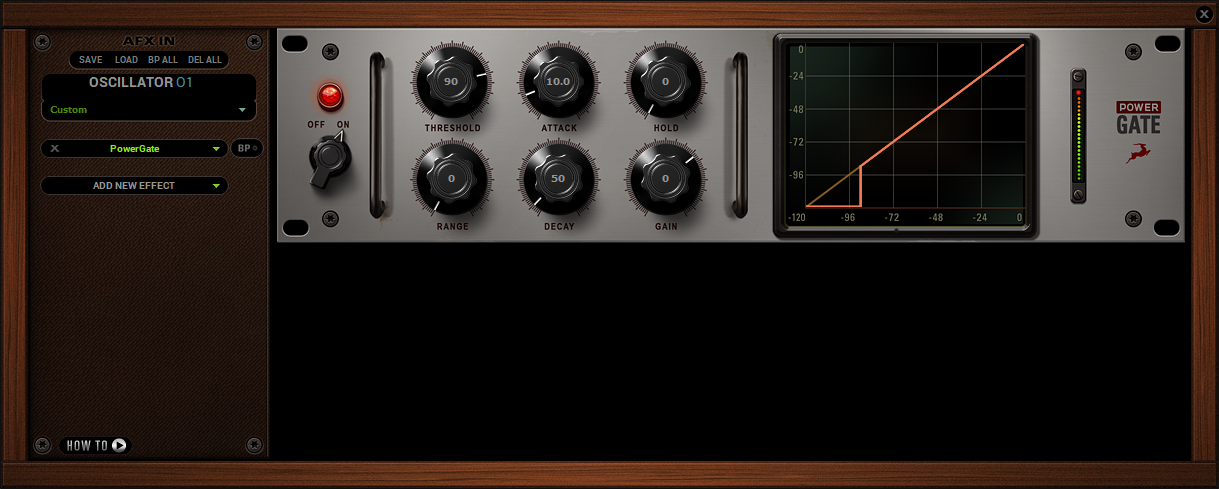
6.3.1 Loading Effects
The AFX Rack is extremely simple to use. It has the following buttons and menus to the left, while the effects are visualized on the right:
 1
1
1. SAVE Button
Saves the current preset for future use & sharing.
2
2. LOAD Button
Loads a previously saved preset.
3
3. BP ALL Button
Instantly bypasses all effects processing.
4
4. DEL ALL Button
Instantly removes all effects currently loaded in the rack.
5
5. Presets Menu
Choose a preset from the drop-down menu.
6
6. ADD NEW EFFECT Menu
Choose an effect from the various categories and add it to the FX rack.
7
8. BP Button
Appears next to an effect – used to bypass it.
8
8. HOW TO Button
Launches a YouTube channel with Antelope Audio video tutorials made to help you master the Control Panel & AFX.
6.4 Discrete 4 Remote Control App
The Discrete 4 Remote control app is specifically designed to work with the Antelope Audio Discrete 4. The app will turn your Android or iOS device into a professional audio interface remote control, allowing you to manage almost all Discrete 4 functionality. Both producers and recording artists are provided with fast and easy access to the device' features!

To use Discrete 4 Remote Control, it is mandatory that both your computer and mobile device are connected to the same Wi-Fi network. Should any problems arise, please refer to the built-in app Troubleshooting Manual.
The Discrete 4 Remote offers:
• Preamp Gain Control and Type
• Volume Control
• Stereo Link Selection
• Clock Source and Sample Rate Selection
• Headphone Volume Control
The graphical user interface and workflow are very similar to the EasyPanel Control Panel on your Mac or PC, which has been covered in great detail throughout this manual. You should be feeling right at home with the Discrete 4 Remote app after reading it.
6.5 Routing System
With the EasyPanel Control Panel, we managed to greatly simplify our routing system without sacrificing any of its flexibility. When you become acquainted with with the Discrete 4 inputs and outputs, routing is simply a matter of navigating through a few drop-down menus!
6.5.1 Discrete 4 Inputs and Outputs
In the routing system, the inputs and outputs of the Discrete 4 are organized as follows:
PREAMP 1-4
These are the 4 Discrete Mic Preamps.
COMPUTER PLAY 1-16
These are your DAW outputs, up to 16 channels.
ADAT IN 1-8
These are the 8 ADAT digital inputs.
S/PDIF IN 1-2
These are the two S/PDIF digital inputs.
MUTE M
Enjoy the silence.
Oscillator O1 & O2
The two oscillators in your Discrete 4 can be routed to the interface’s outputs for testing purposes.
6.5.2 Example Routings
We believe learning by doing is the best approach to understanding our routing system. Hence, we came up with example routings to illustrate how several common recording scenarios will look inside the routing panel.
Considering the system's flexibility and the abundance of connectivity on the Discrete 4 — not to mention those great-sounding preamps and rock-solid clocking — we are confident our product can handle any recording task from the comfort of your desk. Let's begin!
Having trouble hearing any playback from Discrete 4?
⦁ Head to the Monitor/ HP1 section.
⦁ Go to the Monitors & Headphones tab.
⦁ Route Computer Play channels 1 and 2 to a pair of mixer channels of your choice.
⦁ Pan the channels Left and Right accordingly, adjust the volume level with the fader, and consider linking them for your convenience.
⦁ You should be able to hear playback from your main monitors or headphones. If not, adjust the main HP or Monitor volume.
Recording a microphone
Recording an electric guitar
7. Advanced User Tips
Ground Loop Hum and Noise
The design of Discrete 4 minimizes the possibility of ground loop hum and noise. However, we recommend the use of shorter, shielded cables and balanced connections for all the audio signals of your system.
All power cables of the system should be connected to a dedicated outlet box or power conditioner unit to avoid ground current noise affecting the audio signal path. It is also advisable to keep the layout of your signal and power cables separate.
7. Troubleshooting
Start up and Sound:
Are you running the latest control panel and driver?
If not, please update your control panel and firmware.
Are you correctly routing the audio signal via the routing panel?
For USB playback, route the USB play channels to the DAC channel by dragging and dropping from the top section to the bottom. For more info on routing see the Antelope Audio You Tube page.
Have you set the correct sample rates matching your DAW with your computer’s sound and the Discrete 4?
On Mac, first check that the sample rate is correct in the audio midi set up, then proceed to check in the DAW before finally checking the Discrete 4 sample rate.
For Windows, first check in playback devices, right click on the Discrete 4 then click properties before then moving to the advanced tab. Then repeat the above by checking the DAW’s sample as well as the Discrete 4.
Connectivity:
If you believe there is no sound being received to an input or delivered from an output:
Check your source.
Is there a signal being transmitted form the source? Is your source in the correct sample rate for the Discrete 4 to receive?
Check what clocking mode you are in.
Are you receiving the clock signal from the source?
Check that the relevant lock light on the control panel of the Discrete 4 is lit up.
Try a different cable and another source if available.
Check the routing on the control panel.
Have you routed the signal path correctly?
If you have routed signals to the routing mixer, check their corresponding fader is up.
Check the relevant peak meters of the control panel by selecting them in the drop down menu to see if the relevant signal is being received or is being outputted.
DAW
What buffer size is your DAW set to?
If it is significantly low i.e. lower than 128 samples in your buffer size, try increasing it. Try increasing the buffer size from the Discrete 4 control panel (Windows Only)
Is the input and output routing correct in your DAW? Is the Discrete 4 device selected in the relevant sound card section of your DAW’s preferences?
If the Discrete 4 doesn’t show up in your DAW, try unplugging and plugging back the USB 2.0 cable. Then, try restarting your computer. Finally, try re-installing the firmware, drivers and control panel.
8. Technical Specifications
-
ANALOG
Analog Inputs
2 x Mic / Line Inputs
2 x Mic / Line / Hi-Z InputsAnalog Outputs
1 x Monitor Out on TRS 1/4 Jacks, +20 dBu max
4 x Line Outs on TRS, +20 dBu max ( DC coupled )
4 x Stereo Headphone OutputsMic Preamp
EIN: -128 dBu (A-weighted)
Dynamic Range: -121 dB (A-weighted)
THD: -106 dB
Max input: +18 dBu
Max Gain: 65 dBD/A Monitor Converter
Dynamic Range: 124 dB
THD + N: -100 dBA/D Converter
Dynamic Range: 121 dB
THD + N: -112 dBD/A Converters(Line Out)
Dynamic Range: 118 dB
THD + N: – 100dB
DC CoupledHi-Z Input
Discrete JFET design
Maximum input: 14dBu (At min. gain)
Gain Range: 0-40dB
Input Impedance: 1MohmHeadphone Output
Output Level ( unloaded ) 20dBu max
Output impedance 120 ohms
Dynamic Range: 121dB
THD + N: – 100dB
Recommended HP Impedance 16Ω to 600Ω
9. Contacts
Having difficulties with the Discrete 4 or anything else Antelope? Get in touch with us by the following means:
European Direct Support Line
+44 1925933423
10:00 a.m. – 10:00 p.m. (EET), Monday – Friday
USA Direct Support Line
+1 (916) 238-1643
7:00 a.m. – 6:30 p.m. (EST), Monday – Friday
Online (live chat and e-mail)
Antelope Audio Support Page